

The
--insecure flag used in this tutorial is intended for non-production testing only. To run CockroachDB in production, use a secure cluster instead.Before you begin
- Make sure you have already .
- For quick SQL testing or app development, consider instead.
- Note that running multiple nodes on a single host is useful for testing CockroachDB, but it’s not suitable for production. To run a physically distributed cluster in containers, use an orchestration tool like Kubernetes. See for more details, and review the .
Step 1. Create a bridge network
Since you’ll be running multiple Docker containers on a single host, with one CockroachDB node per container, create a Docker bridge network. The network has configurable properties such as a pool of IP addresses, network gateway, and routing rules. All nodes will connect to this network and can communicate openly by default, but incoming traffic can reach a container only through the container’s published port mappings, as described in Step 3: Start the cluster. Because the network is a bridge, from the point of view of the client, the Docker host seems to service the request directly.roachnet with the name of your Docker network.
Step 2: Create Docker volumes for each cluster node
Cockroach Labs recommends that you store cluster data in Docker volumes rather than in the storage layer of the running container. Using a volume has the following advantages over using bind mounts or writing directly to the running container’s filesystem.- Volumes are managed entirely by Docker. A bind mount mounts an arbitrary directory on the Docker host into the container, and that directory could potentially be modified or deleted by any process with permission.
- Volumes persist even if the containers that were using it are deleted. A container’s local storage is temporarily unavailable if the container is stopped, and is permanently removed if the container is deleted.
- When compared to a container’s local storage, writing to either a local volume or a bind mount has considerably better performance because it uses fewer kernel system calls on the Docker host. For an explanation, refer to Manage Data in Docker.
- A volume can be backed up, restored, or migrated to a different container or Docker host. Refer to Back Up, Restore, or Migrate Data Volumes.
- A volume can be pre-populated before connecting it to a container. Refer to Populate a Volume Using a Container.
- A volume can be backed by local storage, a cloud storage resource, SSH, NFS, Samba, or raw block storage, among others. For details, refer to Use a Volume Driver.
Avoid using the
-v / --volume command to mount a local macOS filesystem into the container. Use Docker volumes or a tmpfs mount.Step 3. Start the cluster
This section shows how to start a three-node cluster where:- Each node will store its data in a unique Docker volume.
- Each node will listen for SQL and HTTP connections at a unique port each on the
roachnetnetwork, and these ports are published. Client requests to the Docker host at a given port are forwarded to the container that is publishing that port. Nodes do not listen onlocalhost. - Each node will listen and advertise for inter-node cluster traffic at port 26357 on the
roachnetnetwork. This port is not published, so inter-node traffic does not leave this network.
When SQL and inter-node traffic are separated, some client commands need to be modified with a
--host flag or a --uri connection string. Some commands, such as cockroach init, default to port 26257 but must use the inter-node traffic port (the --listen-addr or --advertise-addr) rather than the SQL traffic port when traffic is separated.-
Start the first node and configure it to listen on
roach1:26257for SQL clients androach1:8080for the DB Console and to publish these ports, and to useroach1:26357for inter-node traffic. The Docker host will forward traffic to a published port to the publishing container. CockroachDB starts in insecure mode and acertsdirectory is not created. -
This command creates a container and starts the first CockroachDB node inside it. Take a moment to understand each part:
docker run: The Docker command to start a new container.-d: This flag runs the container in the background so you can continue the next steps in the same shell.--name: The name for the container. This is optional, but a custom name makes it significantly easier to reference the container in other commands, for example, when opening a Bash session in the container or stopping the container.--hostname: The hostname for the container. You will use this to join other containers/nodes to the cluster.--net: The bridge network for the container to join. See step 1 for more details.-p 26257:26257 -p 8080:8080: These flags map the default port for inter-node and client-node communication (26257) and the default port for HTTP requests to the DB Console (8080) from the container to the host. This enables inter-container communication and makes it possible to call up the DB Console from a browser.-v "roach1:/cockroach/cockroach-data": This flag mounts theroach1Docker volume into the container’s filesystem at/cockroach/cockroach-data/. This volume will contain data and logs for the container, and the volume will persist after the container is stopped or deleted. For more details, see Docker’s volumes documentation.: start (...) --join: The CockroachDB command to in the container. The--advertise-addr,--http-addr,--listen-addr, and--sql-addrflags cause CockroachDB to listen on separate ports for inter-node traffic, DB Console traffic, and SQL traffic. The--joinflag contains each node’s hostname or IP address and the port where it listens for inter-node traffic from other nodes.
-
Start the second node and configure it to listen on
roach2:26258for SQL clients androach2:8081for the DB Console and to publish these ports, and to useroach2:26357for inter-node traffic. The offsets for the published ports avoid conflicts withroach1’s published ports. The named volumeroach2is mounted in the container at/cockroach/cockroach-data. CockroachDB starts in insecure mode and acertsdirectory is not created. -
Start the third node and configure it to listen on
roach3:26259for SQL clients androach2:8082for the DB Console and to publish these ports, and to useroach3:26357for inter-node traffic. The offsets for the published ports avoid conflicts withroach1’s androach2’s published ports. The named volumeroach3is mounted in the container at/cockroach/cockroach-data. -
Perform a one-time initialization of the cluster. This example runs the
cockroach initcommand from within theroach1container, but you can run it from any container or from an external system that can reach the Docker host.cockroach initconnects to the node’s--advertise-addr, rather than the node’s--sql-addr. Replaceroach1:26357with the node’s--advertise-addrvalue. This example runs thecockroachcommand directly on a cluster node, but you can run it from any system that can connect to the Docker host.The following message displays:Each node also prints helpful to its log. For example, the following command runs thegrepcommand from within theroach1container to display lines in its/cockroach-data/logs/cockroach.loglog file that contain the stringnode startingand the next 11 lines.The output will look something like this:
Step 4. Use the built-in SQL client
Now that your cluster is live, you can use any node as a SQL gateway. To test this out, let’s use thedocker exec command to start the in the roach1 container.
-
Start the SQL shell in a container or from an external system that can reach the Docker host. Set
--hostto the Docker host’s IP address and use any of the ports where nodes are listening for SQL connections,26257,26258, or26259. This example connects the SQL shell within theroach1container toroach2:26258. You could also connect toroach3:26259. -
Run some basic :
-
Exit the SQL shell on
roach1and open a new shell onroach2: -
Run the same
SELECTquery as before:As you can see, node 1 and node 2 behaved identically as SQL gateways. -
Exit the SQL shell on node 2:
Step 5. Run a sample workload
CockroachDB also comes with a number of for simulating client traffic. Let’s run the workload based on CockroachDB’s sample vehicle-sharing application, .The
cockroach workload command does not support connection or security flags like other . Instead, you must use a at the end of the command.-
Load the initial dataset on
roach1:26257 -
Run the workload for 5 minutes:
Step 6. Access the DB Console
The gives you insight into the overall health of your cluster as well as the performance of the client workload.-
When you started the first node’s container, you mapped the node’s default HTTP port
8080to port8080on the Docker host, so go to http://localhost:8080. If necessary, replacelocalhostwith the hostname or IP address of the Docker host. -
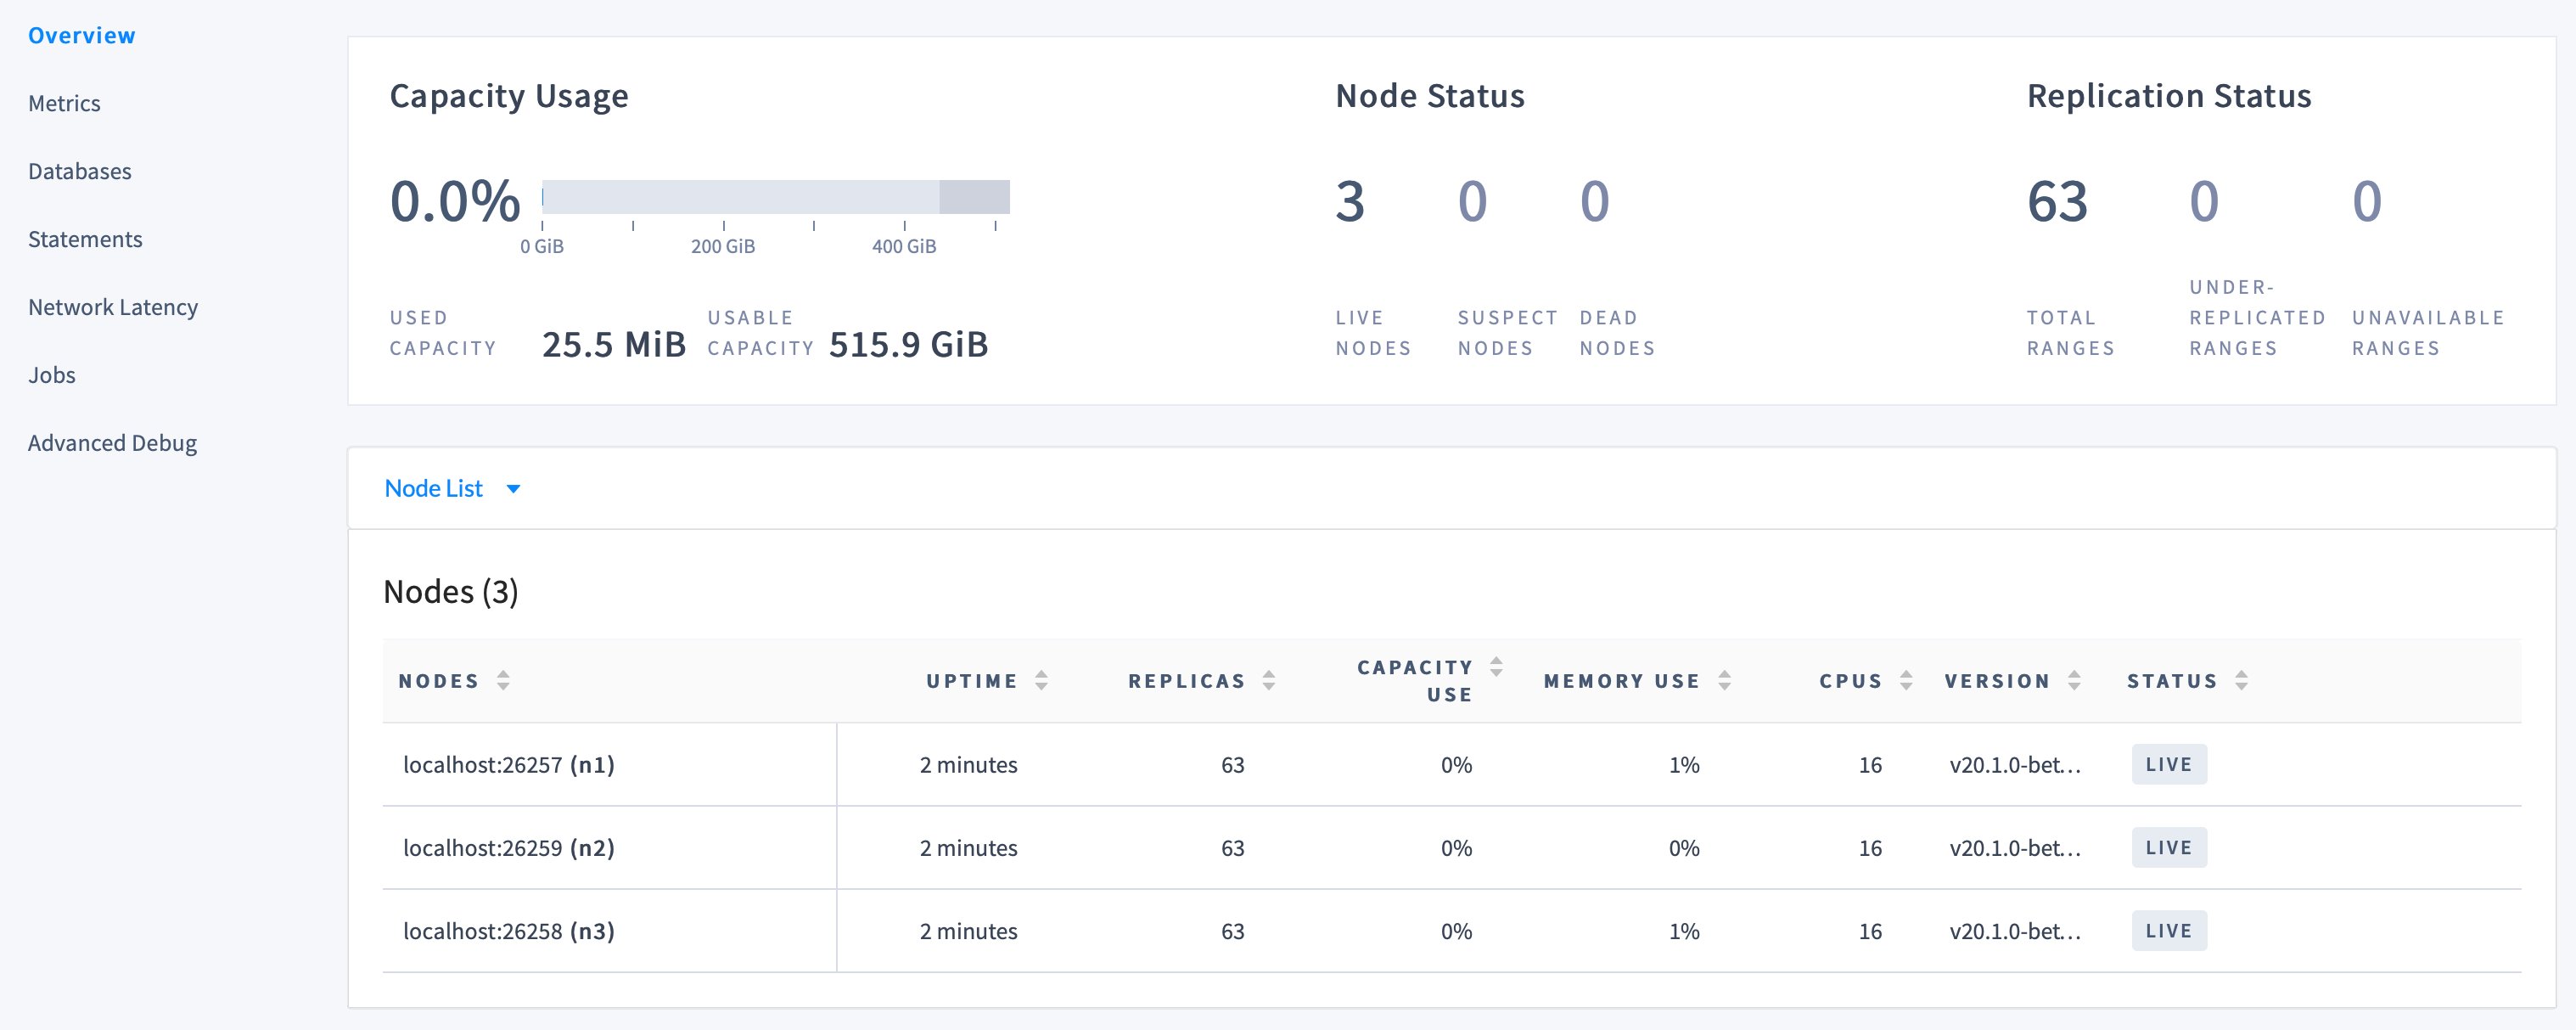
On the , notice that three nodes are live, with an identical replica count on each node:
Capacity metrics can be incorrect when running multiple nodes on a single machine. For more details, see this .
-
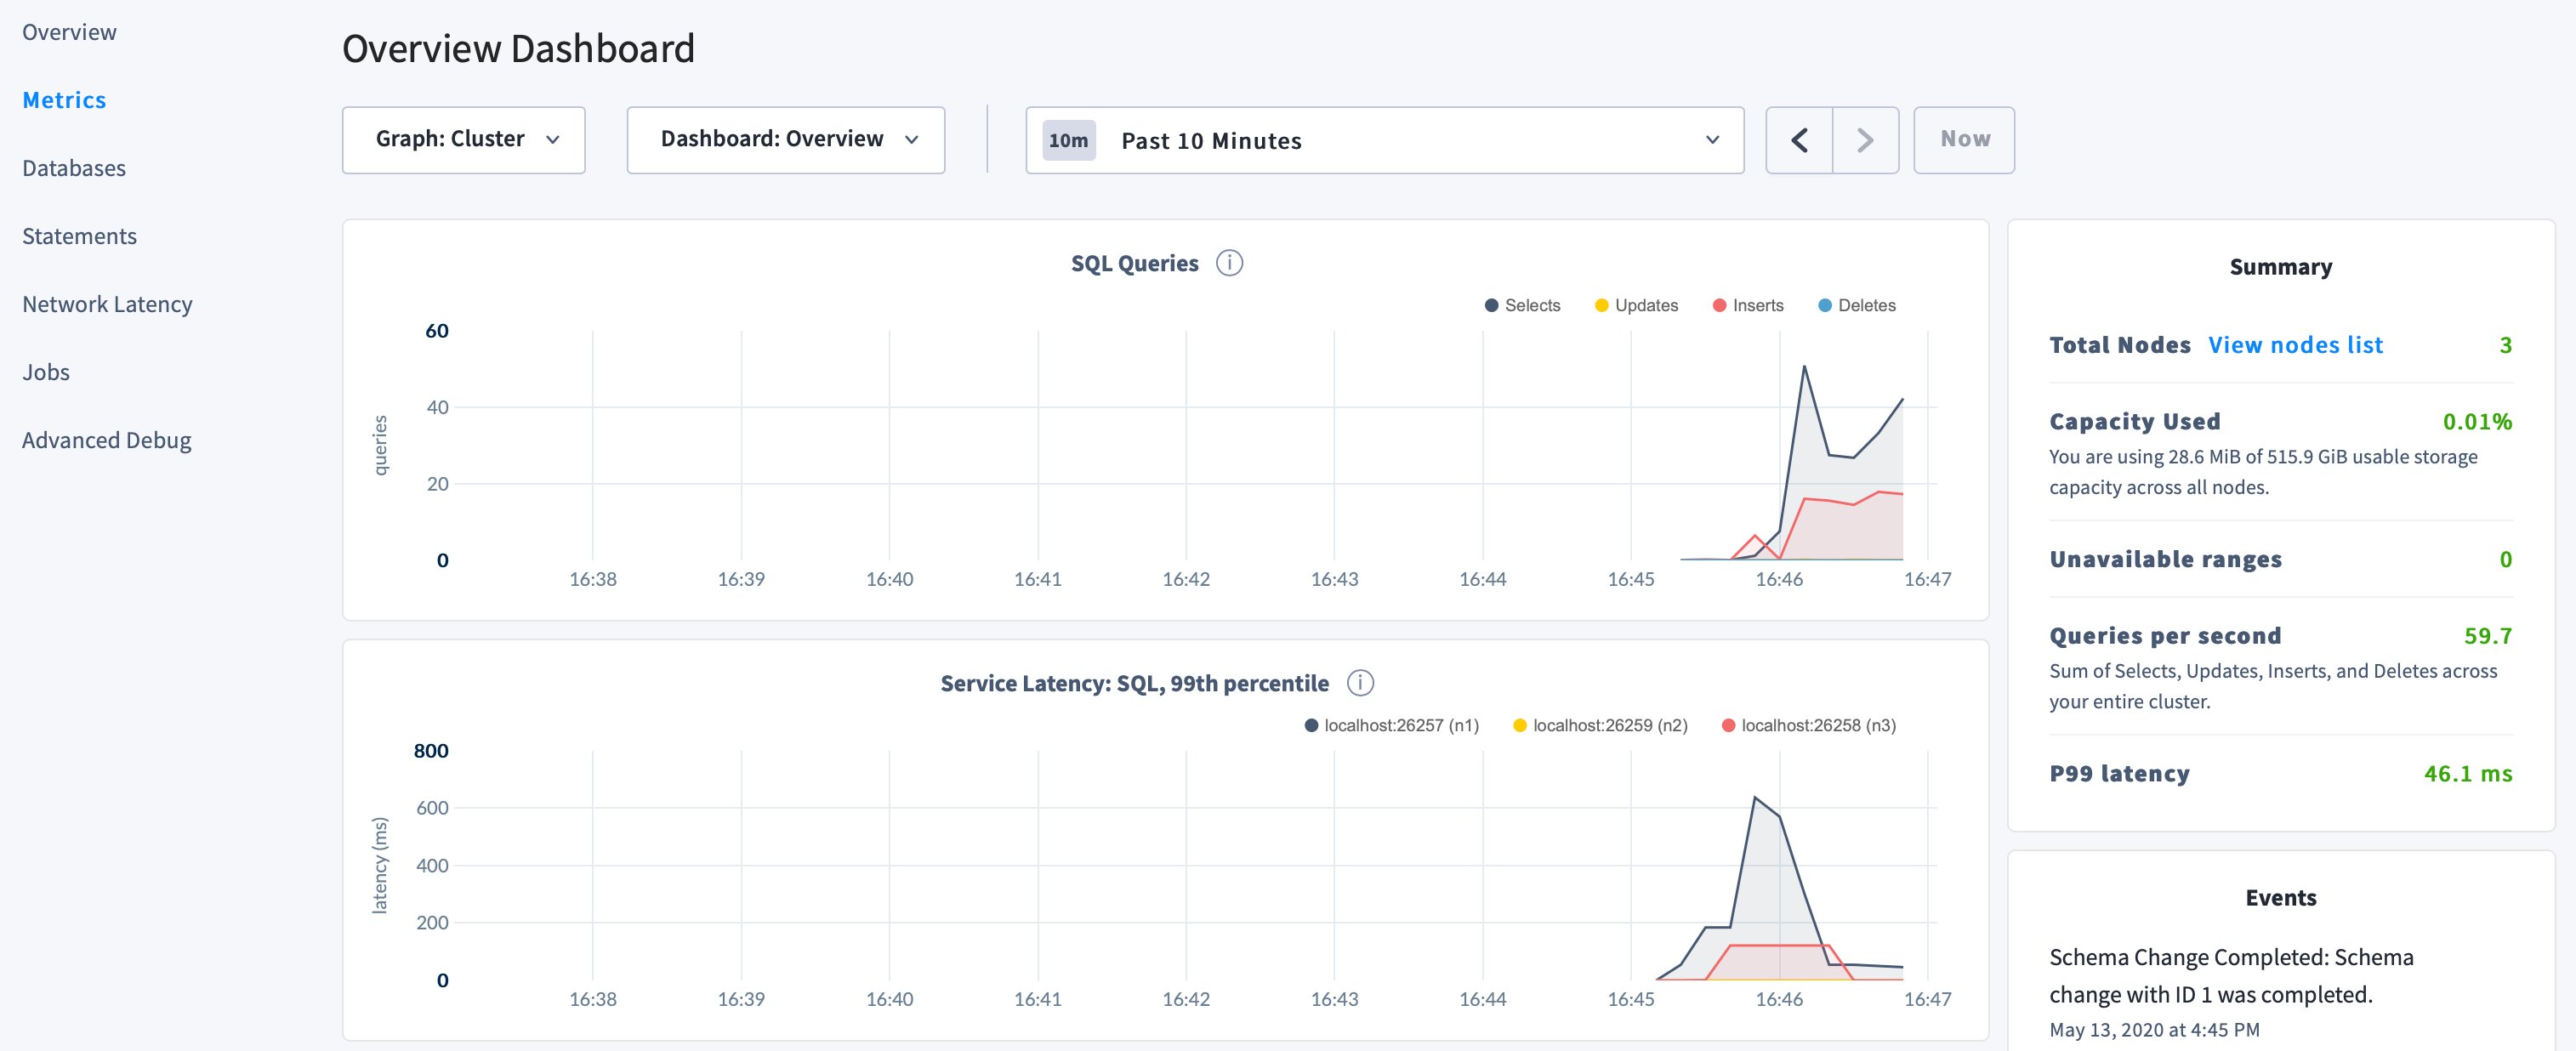
Click to access a variety of time series dashboards, including graphs of SQL queries and service latency over time:
- Use the , , and pages to view details about your databases and tables, to assess the performance of specific queries, and to monitor the status of long-running operations like schema changes, respectively.
-
Optionally verify that DB Console instances for
roach2androach3are reachable on ports 8081 and 8082 and show the same information as port 8080.
-
When you started the first container/node, you mapped the node’s default HTTP port
8080to port8080on the host, so go to http://localhost:8080. -
On the , notice that three nodes are live, with an identical replica count on each node:
-
Click to access a variety of time series dashboards, including graphs of SQL queries and service latency over time:
- Use the , , and pages to view details about your databases and tables, to assess the performance of specific queries, and to monitor the status of long-running operations like schema changes, respectively.
Step 6. Stop the cluster
-
Use the
docker stopanddocker rmcommands to stop and remove the containers (and therefore the cluster). By default,docker stopsends aSIGTERMsignal, waits for 10 seconds, and then sends aSIGKILLsignal. Cockroach Labs recommends that you before forcibly stopping thecockroachprocess, so this example sets the grace period to 5 minutes. If you do not plan to restart the cluster, you can omit-t. -
If you do not plan to restart the cluster, you can also remove the Docker volumes and the Docker network:
What’s next?
- Create a CockroachDB Cloud account where you can for CockroachDB installations
- Learn more about and the
- for your preferred language
- Further explore CockroachDB capabilities like , , , and